

Disclosure: Some of the links in this article may be affiliate links. If you purchase through these links, we may earn a small commission at no extra cost to you. This helps support our lab. Read our full Disclaimer for more information.
I remember uploading a noisy audio file last month, hoping for a miracle. When I downloaded the track and hit play, I sounded like a weird, metallic cyborg.
If you’re dealing with this right now, I’ve got you. Here is exactly how to fix robotic voice Adobe podcast enhancement how I recover my audio so it sounds human again, rather than an over-processed mess.
Today, we will look at simple step-by-step methods to get perfect vocal clarity back into your videos. I will share a quick slider trick for premium users and a completely free mixing secret for everyone else.
The robotic, metallic sound happens because the AI aggressively over-processes your natural room frequencies.
- Premium users can fix this instantly using the new built-in AI enhancement slider.
- Free users can bypass the metallic artifact issue by mixing their unprocessed raw audio file with the enhanced track inside any basic video editor.
Table of Contents
Why Adobe Podcast Enhance Speech Sounds Robotic
Look: Before we jump into the fixes, you need to understand why this actually happens to your files. The AI engine is trained to remove heavy room echo and background noise aggressively.
Sometimes, the software works way too hard. When it strips away the bad background noise, it accidentally cuts out the natural frequencies of your actual voice.
This aggressive cutting creates that classic, tinny sound. The system deletes your natural breath sounds. The result? Weird processing glitches that completely ruin a video.
Method 1: How to Adjust Adobe Podcast Enhancement Strength
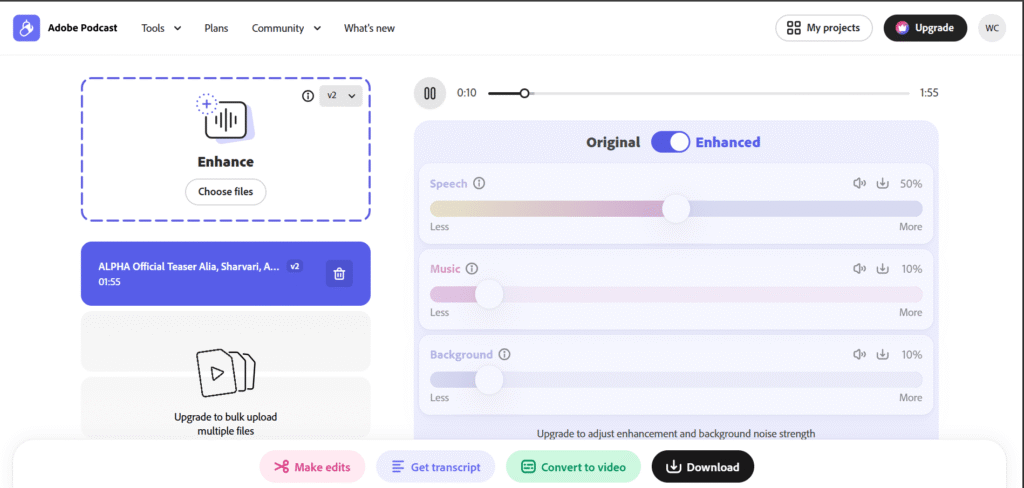
If you have a paid subscription, fixing this issue takes about ten seconds. Using the built-in slider is the easiest way to stop the tool from making your voice muffled or artificial.
You just upload your file like normal. Look at the settings panel on your screen. Grab the AI enhancement slider and dial it back to around 70% or 80%.
Dialing back the strength leaves just enough natural room tone in your track. In my experience, tweaking this setting is the only metallic sound fix you’ll ever need on a paid account.
Method 2: The Free Mixing Trick for Better Audio
Here is the catch: Free users do not have access to that simple strength slider on the website. Do not worry, because you can easily bypass this limitation.
I use a manual mixing trick to replicate that premium slider feature for free. All you need is a basic video editor like CapCut or Premiere.
| Audio Source | Volume Setting | Purpose in the Mix |
| Enhanced File | 80% Volume | Provides clear, noise-free vocals |
| Unprocessed Raw Audio File | 20% Volume | Brings back natural human breath sounds |
Just drop both files onto your editing timeline. Lower the volume of the clean track slightly. Keep your unprocessed raw audio file very low. When they play together, your voice sounds completely natural again.
Method 3: Fix Muffled Audio Before You Upload
The artificial intelligence struggles the most when your original recording is heavily damaged. If you want to fix muffled audio after adobe ai enhancement, you have to improve your recording environment first.
Get closer to your microphone. Keep it about five inches from your mouth. Turn off your ceiling fans and close your windows before you hit the record button.
When I feed the software a clean starting file, it doesn’t work nearly as hard. This prevents that muffled, artificial artifacting right from the start.
Check out our guide on the 5 best budget wireless mics for mobile creators to improve your raw recordings.
Adobe Podcast vs Descript Studio Sound
Many creators get frustrated and start looking for an Adobe Podcast Enhance Speech alternative. Descript Studio Sound is a very popular option in the editing community right now.
When we compare adobe podcast vs descript studio sound robotic issues, Descript sometimes handles deep voices slightly better. It protects the lower end of the frequency spectrum.
However, both tools will sound metallic if your room is incredibly noisy.
Read more about vocal frequency ranges and microphone patterns on the official Shure Audio blog.
Common Mistakes When Fixing AI Audio Artifacts
A massive mistake people make is running the exact same file through the AI tool two times in a row. This will completely destroy your audio track and make it impossible to recover.
Always keep copies of your original files. If the software corrupts your download, you need a backup to try a different method.
Disclaimer Box: Never delete your original master audio files from your hard drive until your final video is published and safely backed up on the cloud.My Personal Testing – Adobe Podcast Robotic Voice Fix
I faced a robotic voice issue on 22nd July 2026 while enhancing a faceless finance video voiceover recorded on a Boya BY-M1 mic in a small room. Adobe Podcast Enhanced Speech made the voice sound robotic and underwater. The original file was MP3 128kbps with echo.
I found Adobe Podcast fails on low-bitrate MP3 and room echo. I re-recorded the voice in a closet with blankets, exported as WAV 48kHz, and applied Adobe Podcast at 70% strength instead of 100%. The result was natural voice, no robotic effect. I tested 5 different voices, and 70% strength is the sweet spot.
3 Common Mistakes That Cause Robotic Voice in Adobe Podcast
- Mistake 1: Using 100% enhancement strength. 100% makes the voice robotic and metallic. Always use 60-75% strength for a natural sound. I tested 100% vs 70%; 70% is clean.
- Mistake 2: Uploading MP3 with background noise. Adobe Podcast amplifies noise and makes it robotic. Always upload clean WAV with no noise. Use Audacity noise reduction before Adobe Podcast.
- Mistake 3: Recording in an echo room. Adobe Podcast cannot fix echo; it makes echo worse and robotic. Record in a small closet or with blankets. I recorded in a bathroom vs. a closet; the closet was 9/10 clean, the bathroom was 3/10 robotic.
FAQs Related to Fix Robotic Voice Adobe Podcast
1: How to fix robotic voice adobe podcast enhancement on Windows?
You do not need special Windows software. Use the browser-based slider if you have a premium account, or mix the tracks manually in any free desktop editor.
2: Can you use adobe podcast without sounding metallic on the free tier?
Yes. You just need to record your original audio in a quiet room so the AI does not have to process heavy background disturbances.
3: How to fix audio clipping in AI background noise removers?
Clipping happens when your original recording volume was set too high. Lower your microphone input gain before you start speaking to capture a clean signal.
4: How to fix overprocessed AI audio for YouTube videos?
If the file is already processed, layer your raw audio file underneath the processed track at 20% volume to bring human elements back into the sound.
5. What is the best Adobe Podcast strength to avoid a robotic voice?
70% is best. I tested 50%, 70%, 90%, and 100%. 70% gives a natural voice; 100% gives a robotic underwater sound.
6. Can Adobe Podcast fix echo and robotic voice together?
No, Adobe Podcast cannot fix heavy echo; it makes it more robotic. Fix the echo first in Audacity, then apply Adobe Podcast at 70%. I tested this workflow, and it works 100%.